Module 1: Introduction
Welcome to the Autonomous Team. This page is your Stage 2 onboarding: everything you need to do to become an active member, in order.
- Apply questionnaire
- Stage 1 due two weeks after applications close
- Team Interview with your subteam
- You are here Stage 2 onboarding and probation, up to eight weeks
- Active Member after your probation review
How Stage 2 works
- It started the day your Team Interview passed. You are on the team now, and you work and learn inside it, with a mentor where possible.
- Probation runs alongside it. Your review happens at the later of four weeks after joining or finishing Stage 2. It looks at whether you did the work or raised problems early, stayed responsive and worked safely. Probation never runs past eight weeks, and Stage 2 left unfinished at eight weeks ends the placement.
- Required coursework ends at Lecture 11. Later lectures are optional for now, in Further learning.
- Use the module list to move between modules. Tick each task card as you finish it; your progress is saved in this browser only, so clearing site data resets it.
Finish Module 2 (SFU & FAS Required Training) and Module 3 (Racerbot Required Training) as soon as you can. You need both before you get lab access. Nothing in the lab, including club equipment and testing days, happens until you have completed them and been added to the access list.
Discord is how the club runs
Meetings, deadlines, task updates and onboarding news are all posted on Discord, and you are expected to keep up with them.
- Check Discord regularly, not just on meeting days.
- Turn notifications on for mentions and for your team’s channels: #team-a-announcements, #car-team-a-chat.
- React to announcements so your lead knows you have read them.
- Ask questions in your team chat or the #help channel.
How the Autonomous Team works
The Autonomous Team (Team A on Discord) writes the software that drives the car: reactive methods, mapping and localization, planning, and the tools around them. We test our algorithms on the real car with the Tech Team.
- Tasks
- Tasks live on the Team A project board on GitHub as
issues, each with a deadline agreed in advance. Unassigned tasks are grouped by area
(reactive, mapping, operations); each week we review progress and take new ones. A
task is finished with a real pull request, and every new feature or major change
updates
RESEARCH.md. Start a Discord thread when a task needs collaboration.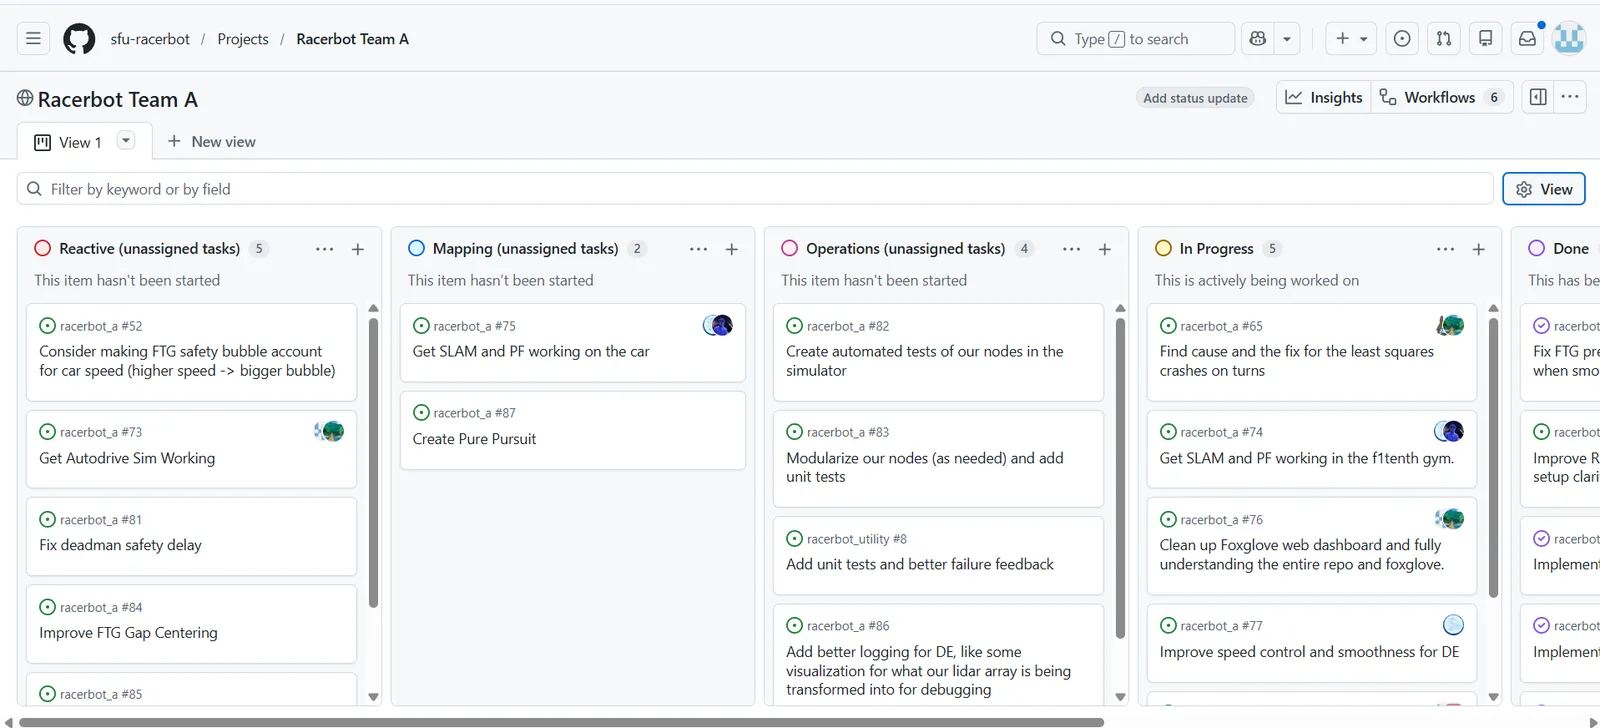
The Team A project board. Pick from the unassigned columns; your task moves to In Progress, then Done. - Contributing code
- Check with the team lead before you start, so your work fits and nobody duplicates
it. Then fork the repository, keep your fork synced with the original, and work on a
branch named for the change:
feature/,bugfix/,docs/,refactor/ortest/followed by a short hyphenated name. Open a pull request with a clear description and push follow-up changes to the same branch. Bugs and ideas go in the repository’s Issues tab. - Roles
- Responsibilities are shared rather than fixed: researching methods and keeping the shared research document current, developing and testing the car’s ROS 2 nodes, and integrating the software on the real car.
- Meetings
- One meeting each week, online or in person; the time and place are posted in #team-a-announcements. Meetings usually open with a Kahoot on the latest lecture, then move to task discussion and testing, so finish the assigned lecture beforehand.
- Communication
- Keep your task teammates updated, and help others with theirs. Communicating means more than reporting progress: discussing shared work is just as valuable.
- Expectations
- Meaningful work is required to stay on the team. Extensions are granted for emergencies, or once per term for up to a week. You will be warned if you are falling short, and continued non-compliance is grounds for removal.
Module 2: SFU & FAS Required Training
SFU and the Faculty of Applied Sciences (FAS) require this training of every club member. Our lab is the FAS Student Team Lab (ASB 9819), so their rules apply on top of ours.
Complete every course below, then submit all your proof together in the last step. Keep each certificate or screenshot as you finish a course; you upload them all at once on the training verification form. You need this module and Module 3 both finished before you get lab access.
-
SFU Safety Orientation
A short online SFU course. Everyone who uses the lab takes it.
- Open the course below and sign in with your SFU computing ID.
- When the course asks for your supervisor, enter Cheng Li.
- Work through the course and finish its quiz.
- Save your certificate of completion, or a screenshot showing the course is complete. You upload it in the last step.
-
EHS Safety Essentials
SFU's lab safety course. You have to request it first, and SFU adds people to the Canvas course in batches, so request it today even if you take it later. You also need its certificate for the FAS agreement below.
- Open the lab safety training page and fill in the registration form with your name, SFU email, SFU ID, your association to SFU (for most members, undergraduate) and your start month and year at SFU.
- For supervisor, enter Cheng Li. For supervisor's department, choose Engineering.
- Tick Safety Essentials Training, complete the reCAPTCHA and submit.
- Wait for SFU to add you to the Canvas course; it shows up on your Canvas dashboard. Then complete its modules and quizzes.
- Save the certificate of completion. You upload it twice: on the FAS agreement and in the last step.
-
SFU anti-bullying and harassment training
SFU requires this of every club member.
- Open the Canvas course below and work through it.
- Pass the quiz at the end.
- Take a screenshot of the completed quiz.
-
Sign the FAS Student Team Space End-User Agreement
Every member who enters the Student Team Lab signs it, and only currently registered SFU students can get lab access. Do this after EHS Safety Essentials, because the agreement asks for that certificate. The FAS rules it refers to are summarized in POL-09 section 3.
- Open the agreement on CourSys and sign in with your SFU computing ID.
- Fill in the team contacts exactly as follows:
- Team Lead: Bryan Ma, email sfuracerbot@gmail.com
- Team Safety Representative: Aston Kwan Lai, email sfuracerbot@gmail.com
- Faculty Sponsor: Cheng Li, email li_cheng@sfu.ca
- Read and accept each provision.
- Upload your EHS Safety Essentials certificate and submit.
- Save a copy of your signed agreement. This is your proof of signing.
-
Submit your proof on the training verification form
The last step of this module. Once everything above is done, upload all of it in one submission:
- SFU Safety Orientation certificate or screenshot
- EHS Safety Essentials certificate
- Anti-bullying and harassment quiz screenshot
- A copy of your signed FAS agreement
Module 3: Racerbot Required Training
The club's own training: how Racerbot is run, how we test the cars safely, and the lab rules. All our safety documents live in the Lab Safety hub.
Read each document, then pass its quiz. Every quiz needs more than 70% and you can retry as often as you like. The in-person safety check comes last; once you pass it, and Module 2 is done, you are added to the lab access list.
-
Guide for New Members and governance quiz
What the club expects from you, the rules every member follows, your rights, and the lab rules, in plain language.
- Read the Guide for New Members.
- Take the governance quiz (15 short questions).
-
Racerbot car testing safety
How we run the cars safely on testing days.
- Read SOP-TECH-02 Vehicle Testing.
- Take the Vehicle Testing quiz.
-
Lab rules
The rules for working in ASB 9819, from POL-03 section 4. They apply to everyone in the lab.
- Sign in and out on the QR-code form at the lab door every time, and sign club tools out and back in on the same form.
- Never work alone: at least one other authorized person must be in the lab.
- No visitors without FAS approval in advance, requested through the Operations Coordinator. Never prop the door open or leave it unlocked. No more than 16 people from all teams at once.
- No food or drink unless sealed in a closed bag. Lab surfaces are treated as contaminated with lead, so wash your hands after working.
- Wear protective equipment suited to the task, including eye protection where needed and closed-toe, closed-heel shoes.
- Only approved activities. No soldering in ASB 9819; it happens in Lab 1 only.
- The lab is shared. Never use another team’s equipment without consent, or photograph or share their project.
- Tag out and report damaged equipment to the Operations Coordinator.
- For now, only Tech Team members can use the lab outside scheduled meeting times.
Breaking the access, working-alone, visitor or approved-activity rules can cost the whole team its lab access.
-
In-person safety check (the last step before lab access)
A one-on-one, 10-minute check in ASB 9819 with the Tech Team Lead, the Operations Coordinator or the President.
- Make sure Module 2 is done (proof submitted) and you have passed every quiz in this module.
- Ask in Discord to book a time.
- Come to the lab in closed-toe, closed-heel shoes. You don't need to bring your certificates.
- Once you pass, you are added to the FAS lab access list.
Module 4: Racerbot Resources
A short guide to where everything lives. Read it through once now, then come back whenever you need to find something.
This module has a single checkbox, at the bottom. Open each link as you go so you know what each place looks like.
The resources library
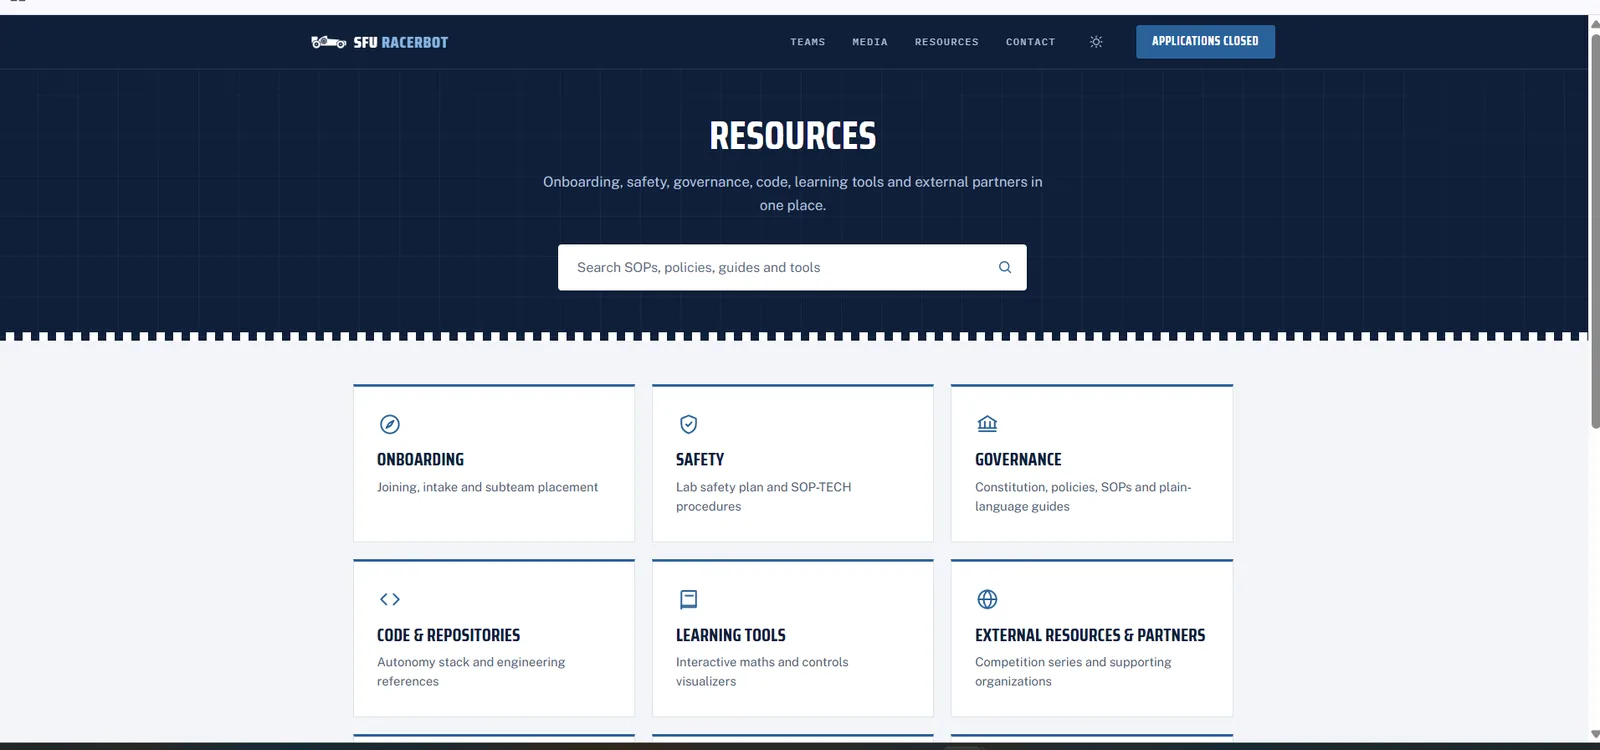
Everything the club has written down starts at the Resources page: onboarding, safety, governance, code, learning tools and partners. When you are not sure where something lives, start here.
Use it for: finding any club page quickly. The search box at the top searches every SOP, policy, guide and tool.
RoboRacer resources
RoboRacer (formerly F1TENTH) is the platform and competition we build on. Our RoboRacer page collects the official sites: the build documentation, the course kit with every lecture and lab, the simulator and the competition rules.
Use it for: course material, official build references and race rules.
Team docs repository (racerbot-docs)
The notes, lab instructions and workflow guides we write ourselves. Every lecture you study has team notes here, and ROADMAP.md lays out the whole course. Read the notes alongside each lecture: they explain the material better than the slides alone.
Use it for: lecture notes, lab instructions and how-to guides.
Code
Our software lives in the sfu-racerbot GitHub organization. The repositories you will use most are racerbot_a (the Autonomous Team’s code, with its RESEARCH.md and policies), racerbot_ws (the shared ROS 2 workspace) and the car workspaces that run on the real cars.
Use it for: source code, issues and pull requests.
Docs and learning tools
Interactive tools for the maths behind the car: vectors, rigid body transforms and PID control, plus an interactive car systems diagram. Docs holds the workspace documentation for both cars and the setup guides. Use them when a lecture gets heavy on maths.
Use it for: building intuition for the maths in the lectures.
IT services, dashboards and runs
How to reach the cars and the pit PC remotely, how to test code on the real car, and coding with the team’s AI tools. The web dashboards show what each car sees live, and the run library replays recorded runs. To get access to a device, ask the @IT-services role on Discord.
Use it for: working with the real cars.
Governance, safety and team policies
The Constitution, club policies and procedures, the Lab Safety Plan and SOPs, and each team’s own rules for tasks, meetings and expectations.
Use it for: checking a rule, a safety procedure or what your team expects of you.
-
I have read this guide
Tick this once you have worked through every section above.
Module 5: Introduction to ROS, RoboRacer & the Simulator
The rest of this track follows the official F1TENTH RoboRacer course: each module in this track groups its lectures, tutorials and labs. Work through them in order. The full lab list is on the course lab index, and each lab from Lab 2 on builds in the official workspace.
The course foundation. Its lectures, Tutorial 1 and Lab 1 are Stage 1 material; here you set up and drive in the simulator, practise ROS 2 and tf2, then build Automatic Emergency Braking. The team workflow guide and simulator setup in racerbot-docs help throughout.
-
Tutorial 2: Introduction to the RoboRacer Simulator
Set up and drive in the RoboRacer simulator used for the labs.
Key concepts: simulator setup, driving the simulated car.
More: course tutorial page.
-
Tutorial 3: ROS 2 and tf2
Hands-on ROS 2 and tf2 practice to accompany Lecture 3.
Key concepts: tf2 transforms, coordinate frames.
More: course tutorial page. The quiz is the same one linked from Stage 1; if you passed it there, it already counts.
-
Lab 2: Automatic Emergency Braking
Develop a ROS 2 safety node that uses LiDAR-based iTTC to detect imminent collisions and trigger Automatic Emergency Braking.
Key concepts: LiDAR scan data, instantaneous TTC, safety node.
Completion: checked in person by the Autonomous Team Lead, who will ask you a few questions about your lab.
Module 6: Reactive Methods
Driving without a map: vehicle states and dynamics, then reactive obstacle avoidance with Follow the Gap. (Lecture 4, on PID control, is Stage 1 material.) The labs put it on the car: a PID wall-following controller, then a full gap-following planner.
-
Lecture 5: Follow the Gap - Obstacle Avoidance
Introduces reactive obstacle avoidance using Follow-the-Gap for fast, map-free navigation.
Key concepts: safety bubbles, disparity extension, gap selection, LiDAR-based speed control.
-
Lecture 6: Vehicle States and Vehicle Dynamics
Introduces vehicle states, dynamics models, tire behaviour and map representations for modeling, simulation, planning and autonomous driving.
Key concepts: vehicle states, dynamics models, tire behaviour, understeer/oversteer, map representations.
-
Lab 3: Wall Following
Develop a PID-based autonomous wall-following controller that uses LiDAR measurements to estimate wall distance, compute steering and adjust speed.
Key concepts: PID control, wall-distance estimation, steering and speed control.
Completion: checked in person by the Autonomous Team Lead, who will ask you a few questions about your lab.
-
Lab 4: Follow the Gap
Implement a reactive Follow-the-Gap algorithm that processes LiDAR scans, identifies safe driving gaps, selects a target point and autonomously navigates the car through obstacles.
Key concepts: gap detection, target-point selection, reactive navigation.
Completion: checked in person by the Autonomous Team Lead, who will ask you a few questions about your lab.
Module 7: Mapping & Localization
Building a map and finding the car in it: probabilistic filtering, particle-filter localization and graph-based SLAM. The tutorial runs slam_toolbox and the particle filter for real; the lab maps the environment and tracks the raceline with pure pursuit.
-
Lecture 7: Filtering
Introduces probabilistic state estimation using Bayes, Kalman and particle filters to fuse odometry and LiDAR measurements.
Key concepts: Bayes filter, Kalman filter, particle filter, sensor fusion.
-
Lecture 8: Localization - Particle Filter
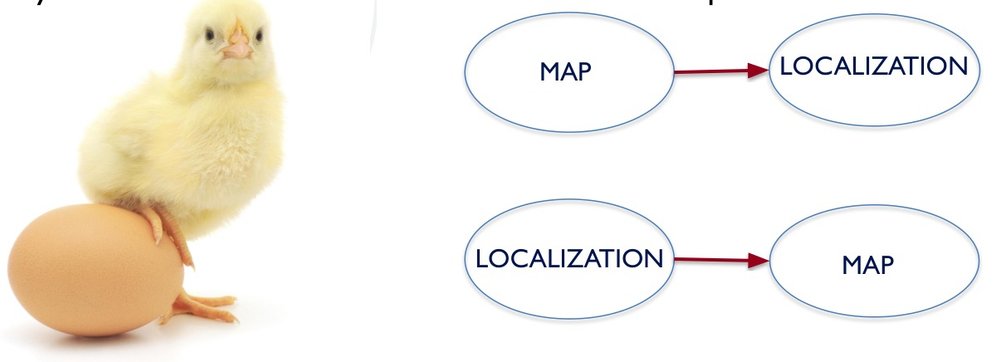
Introduces SLAM, occupancy grid mapping and particle filter localization for accurate map-based vehicle localization.
Key concepts: occupancy grids, Hector SLAM scan matching, particle filter localization, resampling, AMCL with KLD sampling.
-
Lecture 9: Introduction to Graph-based SLAM
Introduces graph-based SLAM for correcting accumulated localization and mapping errors.
Key concepts: pose graphs, spatial constraints, loop closure, least-squares optimization, scan matching.
-
Tutorial 5: Running slam_toolbox and the Particle Filter
Set up and run slam_toolbox for 2D mapping, then configure and run the particle filter for map-based localization.
Key concepts: slam_toolbox, particle filter, RViz2 visualization, map selection, initial pose.
More: course tutorial page.
-
Lab 5: SLAM and Pure Pursuit
Map the environment with SLAM, then track the raceline with pure pursuit.
Key concepts: SLAM, raceline tracking, pure pursuit.
Course assignment Team instructions — not available yetCompletion: checked in person by the Autonomous Team Lead, who will ask you a few questions about your lab.
Module 8: Planning & Control
Tracking and planning trajectories: pure pursuit path tracking, then local planning with RRT and spline-based planners, applied in the motion planning lab.
-
Lecture 10: Pure Pursuit
Introduces Pure Pursuit path tracking, including lookahead-based goal selection, curvature and steering control, speed-dependent tuning, ROS integration and the limitations of the kinematic model.
Key concepts: lookahead point, curvature and steering control, speed-dependent tuning, kinematic-model limits.
-
Lecture 11: Local Planning - RRT and Spline-Based Planners
Local planning methods for driving around obstacles while following a global plan.
Key concepts: RRT, spline-based planners, local planning.
-
Lab 6: Motion Planning
Motion planning, building on the Planning and Control module.
Key concepts: motion planning.
Course assignment Team instructions — not available yetCompletion: checked in person by the Autonomous Team Lead, who will ask you a few questions about your lab.
Further learning (optional)
Nothing here is required for Stage 2. Required coursework ends at Lecture 11; the rest of the F1TENTH course is optional for now and the team will cover it later. Work through it whenever you want to get ahead.
Vision
Seeing the track: classical perception, then machine-learning perception, applied in the perception and planning labs.
-
Lecture 12: Classical Perception
Classical (non-learned) perception techniques, from the Vision module.
Key concepts: classical perception, vision pipelines.
-
Lecture 13: Machine Learning Perception
Machine-learning perception techniques, from the Vision module.
Key concepts: learned perception, neural-network vision.
-
Lab 7: Perception and Vision
Perception and vision, from the Vision module.
Key concepts: perception, vision.
Course assignment Team instructions — not available yetCompletion: checked in person by the Autonomous Team Lead, who will ask you a few questions about your lab.
-
Lab 8: Perception and Planning
Perception and planning, from the Vision module.
Key concepts: perception, planning integration.
Course assignment Team instructions — not available yetCompletion: checked in person by the Autonomous Team Lead, who will ask you a few questions about your lab.
Lab 9: Robot Ethics
A standalone course lab with no parent module: the responsibilities that come with autonomous systems.
-
Lab 9: Robot Ethics
Robot ethics: the responsibilities that come with autonomous systems.
Key concepts: robot ethics.
Course assignment Team instructions — not available yetCompletion: checked in person by the Autonomous Team Lead, who will ask you a few questions about your lab.
Advanced perception and racing
Detection, raceline optimization and model predictive control.
- Lecture 17: Detection and Pose Estimation
- Lecture 18: Extending Single View and YOLO
- Lecture 19: Project Proposal
- Lecture 20: Raceline Optimization
- Lecture 21: Model Predictive Control
- Lecture 22: Moral Decision Making
- Lectures 23–25: Special Topics
Race preparation
How the course ends: project demos, race prep and the Grand Prix.
- Lecture 26: Project Demos
- Lecture 27: Race Prep
- Lecture 28: Race 3: RoboRacer Grand Prix